yaf没有自带的orm,所以必须自己集成orm。今天我就介绍自己喜欢的wedoo数据库操作类
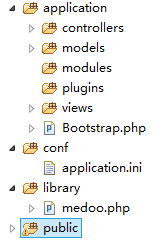
目前使用的版本是0.9.8.3  yaf目录

1.修改public/index.php,在第一句写上

static $_db = NULL;//数据库静态变量

2.修改配置文件conf/application.ini

application.library = APP_PATH “/library”

;数据库加载
database.database_type = “mysql”
database.database_name = “yourdb”
database.server = “localhost”
database.username = “root”
database.password = “”
database.charset = “utf8”
database.port = 3306

数据库连接部分

3.修改library/medoo.php

use Yaf\Bootstrap_Abstract;
class medoo extends Bootstrap_Abstract
{
…. 省略
}

这里是继承Bootstrap_Abstract;

在构造方法中使用

public function __construct($options = null)
{
global $_db;//静态db
$dbConfig=\Yaf\Registry::get(“config”)->database->toarray();
$dbConfig[‘option’]=array(PDO::ATTR_CASE => PDO::CASE_NATURAL);
$options = $dbConfig;
。。。。省略N行
//以上是连接数据库的,这就是为什么要继承Bootstrap_Abstract的原因
//然后把$this->pdo = new PDO($dsn, $this->username, $this->password, $this->option);改成
if(!$_db){
$_db=$this->pdo = new PDO($dsn, $this->username, $this->password, $this->option);
}else{
$this->pdo=$_db;
}

}

配置完毕。这里解释一下为什么要用$_db。简单来说就是单例模式。

使用medoo类。我们可以在模型中这样用 Application/models/SampleModel.php

<?php
class SampleModel extends medoo{

private $_table=’mytable’;

public function show(){
$list=$this->select($this->_table,’*’, array(
‘LIMIT’=>5
));
return $list;
}
}

?>

在Application/controllers/Index.php 这样用
<?php
use Yaf\Controller_Abstract;
class IndexController extends Controller_Abstract {
public function indexAction(){
header(‘content-type:text/html;charset=utf-8’);
$model = new SampleModel();//第一次new
echo ‘<pre>’;
print_r($model->show());
echo ‘</pre>’;
$mo = new SampleModel();//第二次new
}
}
?>

用static $_db 实现单例模式,无论你new多少次模型,数据库只连接一次
官方网站;
http://pecl.php.net/package/msgpack
http://pecl.php.net/package/yar

$wget http://pecl.php.net/get/msgpack-0.5.7.tgz
$tar xvzf msgpack-0.5.7.tgz
$  /usr/bin/phpize
$ ./configure –with-php-config=/usr/local/php/bin/php-config
$ make
$ make install

在php.ini 里添加如下内容.
extension=msgpack.so

编译安装:
$wget http://pecl.php.net/get/yar-1.2.4.tar.gz
$tar xvzf yar-1.2.4.tar.gz
$ /usr/bin/phpize
$./configure –with-php-config=/usr/local/php/bin/php-config
$make & make install

然后会生成yar.so文件在php扩展目录里。
修改php.ini
在最后添加一句
extension=yar.so

1、下载phpredis

官网: https://github.com/phpredis/phpredis

wget https://github.com/phpredis/phpredis/archive/develop.zip

unzip phpredis-develop.zip
cd phpredis-develop

/usr/bin/phpize #用phpize生成configure配置文件
./configure –with-php-config=/usr/local/php/bin/php-config  #配置
make  #编译
make install  #安装

或者 /usr/bin/phpize && ./configure –with-php-config=/usr/local/php/bin/php-config && make && make install

注意 with-php-config 前是两个 “-”

安装完成之后,出现下面的安装路径

/usr/local/php/lib/php/extensions/no-debug-non-zts-20100525/

2、配置php支持

vi /usr/local/php/etc/php.ini  #编辑配置文件,在最后一行添加以下内容

添加

extension=”redis.so”

:wq #保存退出

3、重启服务

service nginx restart

/etc/init.d/php-fpm restart

上一节:window && linux 安装 redis

然后自己动手制作一个redis启动脚本方便管理【接上节配置】

1、vim /etc/rc.d/init.d/redisd

#!/bin/sh

#chkconfig: 345 86 14
#description: Startup and shutdown script for Redis

PROGDIR=/usr/local/bin #安装路径
PROGNAME=redis-server
DAEMON=$PROGDIR/$PROGNAME
CONFIG=/etc/redis/6379.conf
PIDFILE=/var/redis/run/redis_6379.pid
DESC=”redis daemon”
SCRIPTNAME=/etc/rc.d/init.d/redisd

start()
{
if test -x $DAEMON
then
echo -e “Starting $DESC: $PROGNAME”
if $DAEMON $CONFIG
then
echo -e “OK”
else
echo -e “failed”
fi
else
echo -e “Couldn’t find Redis Server ($DAEMON)”
fi
}

stop()
{
if test -e $PIDFILE
then
echo -e “Stopping $DESC: $PROGNAME”
if kill `cat $PIDFILE`
then
echo -e “OK”
else
echo -e “failed”
fi
else
echo -e “No Redis Server ($DAEMON) running”
fi
}

restart()
{
echo -e “Restarting $DESC: $PROGNAME”
stop
start
}

list()
{
ps aux | grep $PROGNAME
}

case $1 in
start)
start
;;
stop)
stop
;;
restart)
restart
;;
list)
list
;;

*)
echo “Usage: $SCRIPTNAME {start|stop|restart|list}” >&2
exit 1
;;
esac
exit 0


2、增加服务并开机启动
cp ./redisd /etc/rc.d/init.d/redisd
chmod +x /etc/rc.d/init.d/redisd
chkconfig –add redisd
chkconfig –level 345 redisd on
chkconfig –list redisd
执行该脚本后,就可以开始start|stop|restart|list你的服务了。

例如: service redisd restart

提示:默认的redis.conf文件参数是前台启动的,修改daemonize no为daemonize yes则为后台启动。

Windows下Redis的安装使用
官方网站:http://redis.io/
官方下载:http://redis.io/download 可以根据需要下载不同版本
windows版:https://github.com/mythz/redis-windows
安装在D:\soft\phpStudy\redis下
进入redis目录后 开启服务
redis-server.exe redis.conf
测试
redis-cli.exe -h 192.168.1.102 -p 6379
set li 111
get li 111
你就会看到结果

Read More →